Blender の python スクリプトの Tips
Python コンソールにスクリプトをインポートする
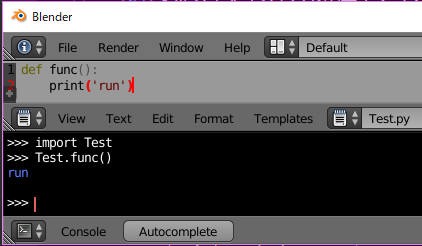
Blender のテキストエディタのテキスト名が .py で終わっているとき、そのスクリプトを Python コンソールにインポートできる。例えば Test.py というスクリプトが存在するとき以下のコマンドでそれをインポートできる。
import Test
アクセスするときはモジュール名をつけてアクセスする。
Test.func()
アクティブオブジェクトの設定
bpy.context.view_layer.objects.active = bpy.data.objects['Cube']
UI
オブジェクトピッカー
StringProperty を prop_search で UI に配置する。もしくは PointerProperty を使う。PointerProperty で poll 関数を指定すると、フィルターがかけられる。
# UI に配置
scene = context.scene
self.layout.column().prop_search(scene, 'the_chosen_object', scene, 'objects')
self.layout.column().prop_search(scene, 'p_object')

def poll(self, object):
    return object.type == 'MESH'
# 登録
def register():
    bpy.utils.register_module(__name__)
    bpy.types.Scene.the_chosen_object : bpy.props.StringProperty()
    bpy.types.Scene.p_object : bpy.props.PointerProperty(type=bpy.types.Object, poll=gp_object_poll)

def unregister():
    bpy.utils.unregister_module(__name__)
    del bpy.types.Object.the_chosen_object
    del bpy.types.Scene.p_object
BMesh
bmesh.from_edit_mesh で BMesh を "取得" する場合は、free() を呼び出してはならない。from_edit_mesh が編集モードでしか機能しないのは、メッシュの内部データをそのまま取得しているからだ。from_edit_mesh で取得したデータは編集モードを抜けると自動的に破棄されるので、free() で解放する必要がない。
編集モードで頂点を選択する
data.vertices[0].select を使う方法では以下の3ステップが必要になる。
- オブジェクトモードへ移行
- 頂点を選択
- エディットモードへ移行
BMesh を使えばその必要はない。
import bmesh
mesh = bpy.context.active_object.data
bm = bmesh.from_edit_mesh(mesh)
bm.verts[0].select_set(True)
mesh.update()
特定のボーン名をフィルター
bones = [b for b in bpy.data.objects['Armature'].pose.bones if 'フィルターしたい文字' in b.name]
ベクトルに同じ値を設定する
o.scale = [1.0]*3
ベクトルを設定する
o.location = [1.0, 2.0, 3.0]
メッシュオブジェクトだけ取得する
mesh_objects = [o for o in bpy.data.objects if o.type=='MESH']
メッシュオブジェクトのモディフィアを取得
modifiers = [m for o in bpy.data.objects if o.type == 'MESH' for m in o.modifiers]
'Armature' という名前のアーマチュアのコンストレイントをすべて取得
constraints = [c for b in bpy.data.objects['Armature'].pose.bones for c in b.constraints]
ラジアンと弧度法の変換
弧度法へ
Blender は角度にラジアンを使っている。弧度法への変換には math.degrees を使う。
degrees(rotation)
ラジアンへ
ラジアンへの変換には math.radians を使う。
radians(rotation)
ドライバー
オブジェクトの hide プロパティにドライバーを追加する
bpy.data.objects['Cube'].driver_add('hide')
オブジェクトの位置の x にドライバーを追加する
bpy.data.objects['Cube'].driver_add('location', 0)
キーフレーム
ボーンにキーフレームを打つ
bone = bpy.context.active_object.pose.bones['hand.ik.L']
bone.keyframe_insert(data_path='location',group='hand.ik.L')
ops を使って選択されたボーンにキーを打つ
#ボーンを選択して以下のコマンドでも可能(ただし遅い)
bpy.ops.anim.keyframe_insert_menu(type='LocRotScale')
#ボーンを選択
bpy.ops.pose.select_all(action="DESELECT")
bpy.context.active_object.data.bones['hand.ik.L'].select = True
ボーンに設定されたプロパティにキーを打つ
bone = bpy.context.active_object.pose.bones['hand.ik.L']
bone.id_data.keyframe_insert(data_path='pose.bones["hand.ik.L"]["ikfk_switch"]')
mathutils を使う
mathutils を使うと、ベクトル・行列・クォータニオンなどが使えるようになる。mathutils を使うにはインポートが必要だ。
import mathutils
ベクトル
ベクトルは mathutils.Vector で作成する。渡すデータはタプルでもリストでもいい。
v = mathutils.Vector((0,1,2))
ベクトルはそのままオブジェクトのベクトルに代入できる。
o.location = v
ベクトルの便利なメソッド
| 正規化 | v.normalize() |
| 内積 | v.dot(v2) |
| 外積 | v.cross(v2) |
| ベクトル間の角度 | v.angle(v2) |
| 反射 | v.reflect(v2) |
| 長さ | v.length() |
| 2乗長さ | v.length_squared() |
そのほかのベクトルの機能
加減乗算もできる。
v2 = mathutils.Vector((5,6,7));
v + v2
v - v2
v * v2 # 内積をとる。外積と紛らわしいので v.dot(v2) がよい。
一部の要素だけ取り出す swizzle もできる。
v.xy = v2.yz
v.xyz = v2.xxx
v.xy = [1, 0] # swizzle への代入はタプルかリストを使う
行列
行列を使うと移動・回転・拡縮を1行で実行できる。また親子構造を持つオブジェクトの座標計算を行列の掛け算で実行できるようになる。加えて Blender では子オブジェクトのワールド座標等は行列から取得する必要がある。
行列の作成方法は使用頻度が低いので公式のドキュメントを参照。この項では行列からデータを取得する方法を紹介する。
to_* メソッドを使う方法
# これはローカル座標。親子付けされている場合、期待とは違う値の可能性がある。
loc_local = bpy.context.active_object.location

m = bpy.context.active_object.matrix_world
loc = m.to_translation() # ワールド座標の取得
rot_euler = m.to_euler() # ワールドオイラー回転を取得
rot_qt = m.to_quaternion() # ワールドクォータニオン回転を取得
scale = m.to_scale() # ワールドスケールの取得
decompose() を使う方法
位置・回転・拡縮のデータがすべて必要な場合、decompose() は一度の呼び出しで取得できるので to_* メソッドよりも効率的だ。
loc, rot, scale = m.decompose()
print(loc)
オペレーターに引数を渡す
オペレーターにプロパティを追加すれば、UI にオペレーターを配置する際に引数を設定できる。以下のコードはひとつめのオペレーターを押すと 10 をコンソールに出力し、ふたつめを押すと 20 を出力する。
class DSKJAL_OT_Operator(bpy.types.Operator):
    bl_idname = 'dskjal.operator'
    arg1 : bpy.props.IntProperty(default=0)

    def execute(self, context):
        print(self.arg1)

class DSKJAL_PT_UI(bpy.types.Panel):
    def draw(self, context):
        op = row.operator('dskjal.operator')
        op.arg1 = 10
        op = row.operator('dskjal.operator')
        op.arg1 = 20
グローバル変数の追加
UI に配置できる変数として、プロパティが必要な場合はプロパティグループにまとめると便利だ。
from bpy.props import *
class MY_PROPERTY_GROUPS(bpy.types.PropertyGroup):
    element : bpy.props.EnumProperty(name='axis', description='Axis', default={'Z'}, options={'ENUM_FLAG'}, items=(('X', 'X', ''), ('Y', 'Y', ''), ('Z', 'Z', '')))
    direction : bpy.props.EnumProperty(name='direction', description='select +/-', default={'-'}, options={'ENUM_FLAG'}, items=(('+', '+', ''), ('-', '-', '')))

# UI に配置
def draw(self, context):
    my_props = context.scene.my_props
    col = self.layout.column(align=True)
    row = col.row()
    row.prop(my_props, 'element')
    row.prop(my_props, 'direction')

# 登録するクラス
classes = (
    MY_PROPERTY_GROUPS,
    # ...
)

# 登録
def register():
    for cls in classes:
        bpy.utils.register_class(cls)
    bpy.types.Scene.my_props = bpy.props.PointerProperty(type=MY_PROPERTY_GROUPS)

def unregister():
    if hasattr(bpy.types.Scene, "my_props"): del bpy.types.Scene.my_props
    for cls in classes:
        bpy.utils.unregister_class(cls)