VRAM8GB で Z Image の LoRA作成
目次
クラウドサービス
wavespeed-ai/z-image/base-lora-trainer は 1,000 step あたり $1.25 で LoRa が作成できる。
WaveSpeedAI はシンガポールにある会社で 2026/01 現在の従業員数は6人らしい。創業者は Zeyi Cheng で David Li は共同創業者。自社でモデルを開発するのではなく、オープンモデルやクローズドモデルの API を利用した SaaS の開発をしている会社。
蒸留 LoRa
自作 LoRa 適用後にこの LoRa を適用すると低ステップ生成ができる。
DiffSynth-Studio/Z-Image-Turbo-DistillPatch
キャプション作成
VLM でキャプションを作成する。今回は LM Studio で Qwen3-VL-8B-Instruct-Q4_K_M.gguf を使った。これは NSFW 画像のキャプション付けには使えない。なお稀に同じ文章を繰り返し出力する場合があるので、キャプションファイルサイズを監視したり、繰り返し検知スクリプトを実行したりする必要がある。
すでにタグリストがある場合、タグリストをプロンプトに入れると精度が上がる。
LM Studio を使ってフォルダ内の画像のキャプションをつけるスクリプト
python -m pip install openai を実行しておく必要がある。
使い方は python ./main.py "画像があるフォルダのフルパス"
import base64
import os
import sys
from pathlib import Path
from openai import OpenAI

MAX_TOKENS = 2000

# 1. LM Studio のローカルサーバー設定
client = OpenAI(base_url="http://localhost:1234/v1", api_key="lm-studio")

def ask_vlm(image_path, prompt):
    # 画像ファイルを Base64 文字列に変換する
    with open(image_path, "rb") as image_file:
        base64_image = base64.b64encode(image_file.read()).decode('utf-8')

    # API リクエストの作成
    response = client.chat.completions.create(
        model="local-model", # LM Studio ではモデル名が自動で解決されるため、任意でOK
        messages=[
            {
                "role": "user",
                "content": [
                    {"type": "text", "text": prompt},
                    {
                        "type": "image_url",
                        "image_url": {
                            "url": f"data:image/jpeg;base64,{base64_image}"
                        },
                    },
                ],
            }
        ],
        max_tokens=MAX_TOKENS,
    )

    return response.choices[0].message.content

def inference(img_path:str, dir_path:str):
    p_file = Path(img_path)
    #user_prompt = "この画像の内容を詳しく説明してください。強調マーク ** を使用しないでください。"
    user_prompt = "Please describe the contents of this image in detail. Do not use the emphasis mark **."
    tag_file_path = f"{dir_path}/{p_file.stem}.txt"
    if os.path.exists(tag_file_path):
        with open(tag_file_path, "r", encoding='utf-8') as f:
            tags = f.read()
            #user_prompt = f"{user_prompt}\n\n以下のタグを可能な限り拾って、説明に反映させてください。タグのリストをそのまま出力しないでください。\n\n# tags\n\n{tags}"
            user_prompt = f"{user_prompt}\n\nPlease collect as many of the following tags as possible and incorporate them into the description. Do not output the list of tags as-is.\n\n# tags\n\n{tags}"

    try:
        result = ask_vlm(f"{dir_path}/{img_path}", user_prompt)

        # タグファイルの保護
        if os.path.exists(tag_file_path):
            os.rename(src=tag_file_path, dst=f"{dir_path}/{Path(tag_file_path).stem}.orig.txt")

        with open(f"{dir_path}/{p_file.stem}.txt", "w", encoding='utf-8') as f:
            print(result, file=f, end="")

    except Exception as e:
        print(f"エラーが発生しました: {e}")

if __name__ == "__main__":
    if len(sys.argv) != 2:
        print('python main.py [ディレクトリのフルパス]')
        sys.exit(1)

    dir_path = sys.argv[1]
    files = [ Path(f) for f in os.listdir(dir_path) if os.path.isfile(os.path.join(dir_path, f)) ]
    files = [ f for f in files if f.suffix in ['.png', '.jpg', '.jpeg', '.webp'] ]
    for f in files:
        inference(img_path=f, dir_path=dir_path)
文字化け
文字化けテキストファイル検出スクリプト
from pathlib import Path
import os

dir_path = r"データセットのフルパス"
files = [ Path(f) for f in os.listdir(dir_path) if os.path.isfile(os.path.join(dir_path, f)) and Path(f).suffix == ".txt" ]

for file_path in files:
    line_number = 1
    errors = []

    try:
        with open(f"{dir_path}/{file_path}", 'rb') as f:  # バイナリモードで開く
            for line in f:
                try:
                    line.decode('utf-8')  # 行ごとにUTF-8でデコード
                except UnicodeDecodeError as e:
                    errors.append(f"行 {line_number}: {e}")
                line_number += 1
    except FileNotFoundError:
        print(f"ファイル {file_path} が見つかりません。")
        continue

    if errors:
        print(f"{file_path} に文字化けあり。")
キャプションファイル一括編集
キャプションファイルの頭に文章追加
Powershell
ls *.txt|%{echo "追加したい文章をここに入れる`n`n$(Get-Content -Path $_ -Raw -Encoding Default)" | Out-File -FilePath $_ -NoNewLine -Encoding Default}
Bash
for i in *.txt; do echo -e "ここに追記したい文章を入れる\n\n $(cat $i)" > "$i"; done
環境構築
構築する環境
- Python 3.12。公式は Python 3.10 で検証している
- cu128
- torch==2.9.0。FlashAttention の cu128 で公開されているのがこのバージョン
- torchvision==0.24.0
ハードウェア等
- Windows11 24H2
- RAM 32 GB
- RTX3050 8 GB
ai-toolkit
git clone https://github.com/ostris/ai-toolkit.git
cd ai-toolkit
py -3.12 -m venv venv
.\venv\Scripts\activate
pip install --no-cache-dir torch==2.9.0 torchvision==0.24.0 torchaudio==2.9.0 --index-url https://download.pytorch.org/whl/cu128
pip install -r requirements.txt
Node.js 18 以降のインストール
Node.js のバージョン 18 以降が必要になる。公式からダウンロードするか、winget で入れる。
winget install "Node.js LTS" -v 18.13.0
UI の起動
cd ui
npm run build_and_start
bat ファイルなら以下のようになる
cd ai-toolkit
call venv\Scripts\activate
cd ui
npm run build_and_start
operation not permitted, rename ~ のようなエラーが出る
前回正しくプロセスが終了できなかったことが原因。タスクマネージャで Node.js のプロセスを終了させる。
モデルについて
ai-tookit はモデルを自動的にダウンロードする。保存場所は %userprofile%/.cache/huggingface/hub。
保管場所を変更する場合はシンボリックリンクを利用すると便利だ。例えばファイルを E:/hub に移動して、管理者権限で Powershell を起動し以下のコマンドを実行する。
New-Item -Type symboliclink -Path "$env:UserProfile\.cache\huggingface\hub" -Value "E:\hub"
学習
小 VRAM 設定
- MODEL で Z-Image を選択すると Layer Offloading が選択できる。これで Transformer Offload と Text Encoder Offload を 100% にすると VRAM8GB でも学習ができる
- New Job の TRAINING の Cache Text Embedding にチェックを入れる。これでテキストエンコーダーがロードされなくなる
- SAMPLE の Disable Sampling で学習中の画像生成を無効にできる
- Linear Rank: 16
- lr: 0.0004 (4e-4)
- Optimizer: AdamW8bit
リソース消費量
- 解像度 1,024
- バッチサイズ1
- RAM 29 GB
- VRAM6GB
- 共有 GPU メモリ 11 GB
推論速度
- 解像度 1,024
- バッチサイズ1
- RTX3050 8GB で 13.8 s/it。FlashAttention ありの musubi-tuner は 26 s/it(musubi-tuner は共有 GPU メモリをほとんど使わない)
- 1,500 step で5時間 30 分
外部リンク
Z-image lora training 5090 ,2 and a half hours for 32 images 1024x1024 ??
- バッチサイズ * ステップ数 は 3,000 以上あったほうがいい
- フォトリアル画像なら解像度は 512 で十分
musubi-tuner
コマンド
git clone https://github.com/kohya-ss/musubi-tuner
cd musubi-tuner
py -3.12 -m venv venv
./venv/Script/activate
pip install torch==2.9.0 torchvision==0.24.0 --index-url https://download.pytorch.org/whl/cu128
pip install -e .
accelerate
accelerate config
- In which compute environment are you running?: This machine
- Which type of machine are you using?: No distributed training
- Do you want to run your training on CPU only (even if a GPU / Apple Silicon / Ascend NPU device is available)?[yes/NO]: NO
- Do you wish to optimize your script with torch dynamo?[yes/NO]: NO
- Do you want to use DeepSpeed? [yes/NO]: NO
- What GPU(s) (by id) should be used for training on this machine as a comma-seperated list? [all]: all
- Would you like to enable numa efficiency? (Currently only supported on NVIDIA hardware). [yes/NO]: NO
- Do you wish to use mixed precision?: bf16
RAdamScheduleFree
公式ドキュメント。RAdamScheduleFree は学習が高速で性能もよい。学習率・スケジューラー・ウォームアップ不要。
pip install schedulefree
指定方法
--optimizer_type schedulefree.RAdamScheduleFree
FlashAttention
インストール
pip install https://huggingface.co/Wildminder/AI-windows-whl/resolve/main/flash_attn-2.8.3%2Bcu128torch2.9.0cxx11abiTRUE-cp312-cp312-win_amd64.whl
指定方法は --sdpa や --xformers の代わりに --flash_attn を指定。
Z-Image
モデル
この記事では musubi-tuner/z-image に以下のファイルがあるとする。
| モデル | URL |
|---|---|
| DiT | z_image_bf16.safetensors |
| Text Encoder | qwen_3_4b.safetensors |
| VAE | ae.safetensors |
事前キャッシング
VRAM が少ない環境なら事前キャッシングは必須。テキストエンコーダーと VAE をロードしなくていいのでメモリの節約になる。
toml ファイルの書き方は公式ドキュメントを参照。
この記事では toml ファイルは musubi-tuner/z-image/z-image-v1.toml とする。
toml ファイル例
# general configurations
[general]
resolution = [1024, 1024] # optional, [W, H], default is [960, 544]. This is the default resolution for all datasets
caption_extension = ".txt" # optional, default is None. This is the default caption extension for all datasets
batch_size = 1 # optional, default is 1. This is the default batch size for all datasets
num_repeats = 1 # optional, default is 1. Number of times to repeat the dataset. Useful to balance the multiple datasets with different sizes.
enable_bucket = true # optional, default is false. Enable bucketing for datasets
bucket_no_upscale = true # optional, default is false. Disable upscaling for bucketing. Ignored if enable_bucket is false

### Image Dataset

# sample image dataset with caption text files
[[datasets]]
image_directory = "データセットディレクトリのフルパス"
caption_extension = ".txt" # required for caption text files, if general caption extension is not set
resolution = [1024, 1024] # required if general resolution is not set
batch_size = 1 # optional, overwrite the default batch size
num_repeats = 1 # optional, overwrite the default num_repeats
enable_bucket = true # optional, overwrite the default bucketing setting
bucket_no_upscale = true # optional, overwrite the default bucketing setting
#cache_directory = "/path/to/cache_directory" # optional, default is None to use the same directory as the image directory. NOTE: caching is always enabled
#control_directory = "/path/to/control_dir" # optional, required for dataset with control images
Latents のキャッシュ
python src/musubi_tuner/zimage_cache_latents.py --dataset_config "z-image/z-image-v1.toml" --vae "z-image/ae.safetensors"
以下のようなエラーが出る場合はダウンロードする VAE を間違えている。
RuntimeError: Error(s) in loading state_dict for AutoEncoder:
        Missing key(s) in state_dict:
変換速度
RTX3050・解像度 1024 x 1024 で 1.3 s/it 程度。
Text Encoder のキャッシュ
python src/musubi_tuner/zimage_cache_text_encoder_outputs.py --dataset_config "z-image/z-image-v1.toml" --text_encoder "z-image/qwen_3_4b.safetensors" --batch_size 16 --fp8_llm
VLM が OCR したときに文字化けした文字を出力することがあり、その場合以下のようなメッセージを出して処理が止まる。
UnicodeDecodeError: 'utf-8' codec can't decode byte 0x81 in position 2085: invalid start byte
変換速度
RTX3050 で 2 it/s 程度。
学習
accelerate launch --num_cpu_threads_per_process 1 --mixed_precision bf16 src/musubi_tuner/zimage_train_network.py \
    --dit "z-image/z_image_bf16.safetensors" \
    --vae "z-image/ae.safetensors" \
    --text_encoder "z-image/qwen_3_4b.safetensors" \
    --dataset_config "z-image/z-image-v1.toml" \
    --flash_attn --mixed_precision bf16 \
    --fp8_base --fp8_scaled \
    --timestep_sampling shift --weighting_scheme none --discrete_flow_shift 2.0 \
    --optimizer_type schedulefree.RAdamScheduleFree --learning_rate 2e-4 --gradient_checkpointing --gradient_checkpointing_cpu_offload \
    --blocks_to_swap 27 \
    --max_data_loader_n_workers 2 --persistent_data_loader_workers \
    --network_module networks.lora_zimage --network_dim 16 \
    --max_train_epochs 50 --save_every_n_epochs 20 --seed 42 \
    --output_dir "z-image/outputs" --output_name style-lora
リソース消費量
- 解像度:1024 x 1024
- Aspect Ratio Bucketing 有効
- Flash Attention 使用
- RAdamScheduleFree 使用
- 29 枚 * 50 エポック
- バッチサイズ:1
- VRAM 使用量: 5.8 GB
- RAM 使用量: 22 GB
- 学習速度:26 s/it
- 学習にかかった時間:10 時間 30 分
ComfyUI で使えるよう Diffusers 形式に変換
python src/musubi_tuner/networks/convert_lora.py --input "z-image/outputs/style-lora.safetensors" --output "z-image/outputs/style-lora-comfy.safetensors" --target other
もしくは
python src/musubi_tuner/networks/convert_z_image_lora_to_comfy.py "z-image/outputs/style-lora.safetensors" "z-image/outputs/style-lora-comfy.safetensors"
convert_z_image_lora_to_comfy は nuncyaku で動作しない可能性がある。
Z-Image Turbo
外部リンク
My Final Z-Image-Turbo LoRA Training Setup – Full Precision + Adapter v2 (Massive Quality Jump)
- リンク先のスレッドでは解像度は 512 で十分と言っているが、細部の再現性を求めるならもっと必要
- ステップ数は上限 3,000。fp32 かつデータセットが優れているなら 5,000 ステップまでいける
- ベースは ostris zimage_turbo_training_adapter_v2
- LoRA rank/alpha 16 (linear + conv)
- Flowmatch scheduler + sigmoid timestep
- AdamW8bit optimizer, LR 0.00025, weight decay (0.0001)
Z-Image *perfect* IMG2IMG designed for character lora's - V2 workflow (including LORA training advice)
- 解像度 512
- 画像枚数 20-35。80% が顔のアップやバストアップ、残りが全身
- 画像当たり 100 ステップ
- トリガーワード・キャプションなし(画風変換 LoRA なので)
AI toolkit + Z-image lora training (works on 8GB VRAM)
ツール
ai-toolkit がサポートしている。ostris/zimage_turbo_training_adapter が必要。v2 は LoRA のランクと学習時間とを増やしたバージョンでこちらが推奨されている。
musubi tuner でも作成可能。ベースはDe Turbo。
ベースモデルのキャプション方法
Z Image は markdown で構造化されたキャプションも理解できるが、学習はタグリストとべた書きの自然言語とで行われている。学習に使われている言語は英語と中国語。
テキストエンコーダーの Qwen 3 4b は日本語も理解できるが、日本語の理解力は低い。
キャプションの作成方法
VLM を使って5種類のキャプションを作成し、ランダムに選択して使用している。
- タグリスト
- 短いキャプション
- 中程度の長さのキャプション
- 長いキャプション
- ユーザーの入力したプロンプトをシミュレートした短いキャプション
画像の要素をタグで出力
VLM に画像とシステムプロンプトとを入力してタグリストを出力させる。論文の例ではテキストはシングルクオートになっている。
以下の情報も追加する:
- OCR を使い、VLM が見落としたテキスト
- World Knowledge データベース(非公開モデル)を使い、画像の場所や VLM が知らないオブジェクトの名前など
- 推論モデルを使った推論過程
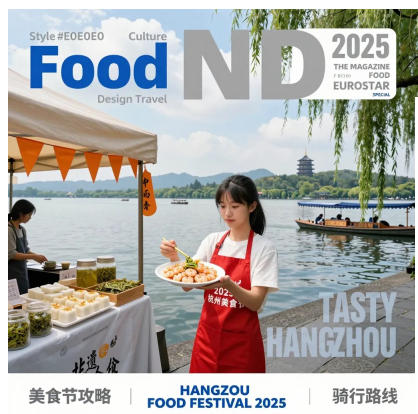
入力画像
出力例
1 girl, single subject focus, young woman, another person in the background, East Asian, black hair, bangs, white T-shirt, red apron, Hangzhou food festival, holding a plate, using hopsticks, Longjing shrimp, West Lake, Hangzhou, China, Leifeng Pagoda, EUROSTAR, magazine cover, outdoors, daytime, lakeside, water, tour boat, willow trees, displayed food, smanthus cake, tea leaves, glass jars, orange triangular flags, white tents, photography, half-body shot, white border, 'Food', 'Culture', 'Design Travel', 'ND', '2025', 'THE MAGAZINE', 'F BIODI', 'FOOD', 'EUROSTAR', 'SPECIAL', 'TASTY HANGZHOU', '美⻝节攻略', 'HANGZOU FOOD FESTIVAL 2025', '骑⾏路线', '2025 杭州美⻝节
短い自然言語の例
以下の4つを VLM に入力して短いキャプションを作る。
- 入力画像
- タグリスト
- 推論モデルの推論過程
- 短いキャプションを作成させるシステムプロンプト
出力例
A promotional magazine cover themed around Hangzhou Cuisine, featuring a young woman at a West Lake food stall during the 2025 Hangzhou Food Festival, holding a plate and selling Longjing shrimp.
長い自然言語の例
以下の4つを VLM に入力して長いキャプションを作る。
- 入力画像
- タグリスト
- 推論モデルの推論過程
- 長いキャプションを作成させるシステムプロンプト
出力例
A “Food ND” magazine cover, a special issue about “HANGZHOU FOOD FESTIVAL 2025.” The scene takes place on the shore of West Lake, one of Hangzhou’s iconic andmarks, captured in a vibrant, sunny daytime setting.At the center of the image is a young East Asian woman with black hair, wearing a white T-shirt and a bright red apron. She is holding a white plate of the famous local dish Longjing Shrimp and lifting a piece with a pair of green chopsticks. The red apron is printed with white text reading “2025 杭州美⻝节”. To her right is a food stall under a white tent, decorated with a string of orange triangular flags. On the table are various local delicacies: two jars of Longjing tea leaves, a wooden tray with square white cakes sprinkled with osmanthus, several jars of pickled vegetables, and an orange hanging tag with vertical black text reading “中⾬⾹”. In the background is the expansive view of West Lake, its surface shimmering in the sunlight, with several traditional-style boats gliding across the water. On the opposite shore rise lush green hills, and the famous Leifeng Pagoda stands clearly on the right-side hilltop...(続く)